2026. 7. 1. 16:39ㆍ카테고리 없음
블로그의 첫번째 글로 쓴 논문리뷰를 다시 읽어보니 독자 입장에서 평어채보다는 경어채가 읽기 편할 것 같아 말투를 바꿔 보겠습니다.
이번에 작성할 글은, 저번 논문리뷰에 이어 핵심 아이디어인 Attention Rollout을 실전에 적용해본 과정을 적어보려고 합니다.
Kaggle APTOS 2019 Blindness Detection 대회의 dataset으로 ViT를 학습시키고, 모델 내부를 해석하기 위한 시각화 기법중 하나인 Rollout을 적용하는 코드입니다.(kaggle ViT학습 리뷰)
Quantifying Attention Flow in Transformers(ACL 2020) 논문을 읽고 해당 아이디어를 적용했습니다.
아래는 해당 노트북 링크입니다.
먼저 dataset과 사전학습된 모델을 불러오겠습니다.( best_aptos_model.pt로 저장해두었습니다.)
# This Python 3 environment comes with many helpful analytics libraries installed
# It is defined by the kaggle/python Docker image: https://github.com/kaggle/docker-python
# For example, here's several helpful packages to load

import numpy as np # linear algebra
import pandas as pd # data processing, CSV file I/O (e.g. pd.read_csv)

# Input data files are available in the read-only "../input/" directory
# For example, running this (by clicking run or pressing Shift+Enter) will list all files under the input directory

import os

count=0

for dirname, _, filenames in os.walk('/kaggle/input'):
    for filename in filenames:
        print(os.path.join(dirname, filename))
        count+=1
        if count>20:
            break

    if count>20:
        break

# You can write up to 20GB to the current directory (/kaggle/working/) that gets preserved as output when you create a version using "Save & Run All"
# You can also write temporary files to /kaggle/temp/, but they won't be saved outside of the current session

# Use the kagglehub client library to attach Kaggle resources like competitions, datasets, and models to your session
# Learn more about kagglehub: https://github.com/Kaggle/kagglehub/blob/main/README.md

import kagglehub
# kagglehub.dataset_download('<owner>/<dataset-slug>')
/kaggle/input/notebooks/ryuminhyuk/aptos-vit-baseline/results.html
/kaggle/input/notebooks/ryuminhyuk/aptos-vit-baseline/huggingface_repos.json
/kaggle/input/notebooks/ryuminhyuk/aptos-vit-baseline/submission.csv
/kaggle/input/notebooks/ryuminhyuk/aptos-vit-baseline/notebook.ipynb
/kaggle/input/notebooks/ryuminhyuk/aptos-vit-baseline/output.json
/kaggle/input/notebooks/ryuminhyuk/aptos-vit-baseline/best_aptos_model.pt
/kaggle/input/notebooks/ryuminhyuk/aptos-vit-baseline/custom.css
/kaggle/input/notebooks/ryuminhyuk/aptos-vit-baseline/results_files/results_15_0.png
/kaggle/input/notebooks/ryuminhyuk/aptos-vit-baseline/results_files/results_11_0.png
/kaggle/input/notebooks/ryuminhyuk/aptos-vit-baseline/results_files/results_7_2.png
/kaggle/input/competitions/aptos2019-blindness-detection/sample_submission.csv
/kaggle/input/competitions/aptos2019-blindness-detection/train.csv
/kaggle/input/competitions/aptos2019-blindness-detection/test.csv
/kaggle/input/competitions/aptos2019-blindness-detection/train_images/ef476be214d4.png
/kaggle/input/competitions/aptos2019-blindness-detection/train_images/6dcde47060f9.png
/kaggle/input/competitions/aptos2019-blindness-detection/train_images/ec363f48867b.png
/kaggle/input/competitions/aptos2019-blindness-detection/train_images/17f6c7072f61.png
/kaggle/input/competitions/aptos2019-blindness-detection/train_images/b49b2fac2514.png
/kaggle/input/competitions/aptos2019-blindness-detection/train_images/af6166d57f13.png
/kaggle/input/competitions/aptos2019-blindness-detection/train_images/8d13c46e7d75.png
/kaggle/input/competitions/aptos2019-blindness-detection/train_images/c3b15bf9b4bc.png
Plot할 이미지 고르기
train data중에 여러개의 이미지를 띄워보고 가장 깔끔한 형태의 이미지를 찾아보겠습니다.
import pandas as pd
from glob import glob
import matplotlib.pyplot as plt
from PIL import Image
import numpy as np
import cv2
import albumentations as A
from albumentations.pytorch import ToTensorV2
import torch
test_df=pd.read_csv('../input/competitions/aptos2019-blindness-detection/test.csv')

#test_df에 이미지 path 만들기
all_image_path={os.path.basename(x).replace('.png',''):x for x in
               glob(os.path.join('..','input','competitions','aptos2019-blindness-detection','test_images','*.png'))}
print('Scans Found:', len(all_image_path), 'Total image Index:', len(test_df))

test_df['path']=test_df['id_code'].map(all_image_path.get)
test_df.head()
diagnosis_df=pd.read_csv('../input/notebooks/ryuminhyuk/aptos-vit-baseline/submission.csv')

df=pd.merge(test_df, diagnosis_df, on='id_code', how='inner')
df.head()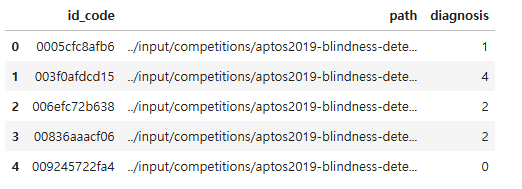
diagnosis_df는 사전학습한 모델이 test data를 예측한 값을 저장해둔 df입니다.
#image plot 함수
def plot_images(df, rows, columns, figsize):
    fig, axes=plt.subplots(rows, columns, figsize=figsize)
    idx=0
    for i in range(rows):
        for j in range(columns):
            image=np.array(Image.open(df['path'].values[idx]).convert('RGB'))
            axes[i,j].imshow(image)
            axes[i,j].set_title(f'Label: {df['diagnosis'].values[idx]}, id: {df['id_code'].values[idx]}')

            idx+=1

    plt.show()


plot_images(df, 3,3, (10,10))
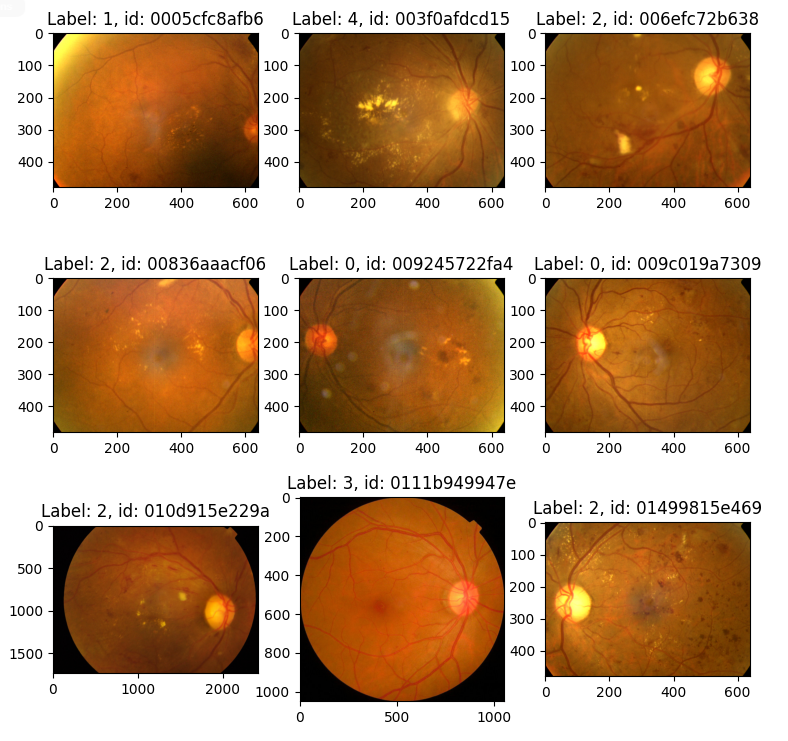
8번 이미지가 가장 깔끔해보입니다.
8번째 이미지로 attention rollout
#AutoCrop 코드
def AutoCrop(img, tol=7):   #tol=tolerance(허용 오차)-밝기 7 이하인 픽셀은 크롭
    gray_image=cv2.cvtColor(img, cv2.COLOR_RGB2GRAY)

    mask=gray_image>tol
    row_mask=mask.any(1)  #열을 흝으며 해당 행에 true를 찾음-그래서 1
    col_mask=mask.any(0)

    check_shape=img[:,:,0][np.ix_(row_mask, col_mask)].shape
    #np.ix_(mask.any(1), mask.any(0)) 브로드케스팅 계산이 가능한 형태로 튜플 반환((3,1),(1,3) 형태의 array)

    if check_shape[0]==0:
        return img

    else:
        img1=img[:,:,0][np.ix_(row_mask, col_mask)]
        img2=img[:,:,1][np.ix_(row_mask, col_mask)]
        img3=img[:,:,2][np.ix_(row_mask, col_mask)]

        img=np.stack([img1, img2, img3], axis=-1)

        return img


#Ben Graham 전처리 코드
def ben_color(img):
    blur=cv2.GaussianBlur(img, (0,0), sigmaX=20)  #가우시안 커널 (0,0)으로 두면 시그마 값에 맞춰서 자동 설정

    #조도 보정 공식 구현 (4*original-4*blur+128)
    result=cv2.addWeighted(img, 4, blur, -4, 128)
    return result
#시각화 해보기
image=np.array(Image.open(df['path'].values[7]).convert('RGB'))
img1=AutoCrop(image)
img2=ben_color(img1)
fig, axes=plt.subplots(1,3, figsize=(10,4))
axes[0].imshow(image)
axes[0].set_title('Original')
axes[1].imshow(img1)
axes[1].set_title('Autocrop')
axes[2].imshow(img2)
axes[2].set_title('Autocrop+Ben Color')
for ax in axes:
ax.axis('off')
#전처리
test_transform=A.Compose([
    A.Resize(384,384),
    A.Normalize(),
    ToTensorV2()]
)

img=test_transform(image=img2)['image']   #AutoCrop, ben 전처리 완료 후 리사이즈, 정규화

input=img.unsqueeze(0) #배치 축 생성(albumentation은 배치 축 없는걸 받음)
input을 모델에 넣기 위해 배치 축을 생성해줍니다.
모델 생성
timm 라이브러리에서 패치 사이즈16/이미지 사이즈 384 모델을 불러온 다음, 사전 학습된 모델의 가중치를 불러옵니다.
!pip install timmimport timm
device='cuda' if torch.cuda.is_available() else 'cpu'
model=timm.create_model('vit_base_patch16_384', pretrained=True, num_classes=1) #224모델을 384로 파인튜닝 한 모델, 헤드는 초기화
input=input.to(device)
model.to(device)
output=model(input)
print(output.shape)
torch.Size([1, 1])
model.load_state_dict(torch.load('../input/notebooks/ryuminhyuk/aptos-vit-baseline/best_aptos_model.pt', map_location=device))
Rollout 구현
[Code Reference]
- GitHub Repository:
jacobgil/vit-explain - Author: Jacob Gildenblat
아래 있는 VITAttentionRollout 코드의 출처입니다.
훅을 걸기 위해 레이어 이름을 확인해줍니다.
#timm 모델의 레이어 이름 출력해서 확인하기
for name, module in model.named_modules():
    if 'attn_drop' in name:
        print(name)
blocks.0.attn.attn_drop
blocks.1.attn.attn_drop
blocks.2.attn.attn_drop
blocks.3.attn.attn_drop
blocks.4.attn.attn_drop
blocks.5.attn.attn_drop
blocks.6.attn.attn_drop
blocks.7.attn.attn_drop
blocks.8.attn.attn_drop
blocks.9.attn.attn_drop
blocks.10.attn.attn_drop
blocks.11.attn.attn_drop
def rollout(attentions, discard_ratio, head_fusion):
    result = torch.eye(attentions[0].size(-1))   #어텐션 맵 하나의 크기는 [1, 12, 577, 577](배치, 헤드, 토큰, 토큰)
    #처음 곱셈을 시작할 단위행렬 생성
    with torch.no_grad():
        for attention in attentions:    #헤드를 섞는 방식. 논문에서는 mean
            if head_fusion == "mean":
                attention_heads_fused = attention.mean(axis=1)
            elif head_fusion == "max":
                attention_heads_fused = attention.max(axis=1)[0]  #[0]을 붙인 이유는 max() 함수가 (최대값, 인덱스) 쌍을 뱉기 때문
            elif head_fusion == "min":
                attention_heads_fused = attention.min(axis=1)[0]
            else:
                raise "Attention head fusion type Not supported"

            # Drop the lowest attentions, but
            # don't drop the class token
            #자잘한 노이즈 쳐내기 위해 discard_ratio만큼의 데이터는 0으로 만들기
            #작은 값이어도 행렬 곱셈을 계속 누적하다보면 배경이 하얗게 번지는 블러 생김
            flat = attention_heads_fused.view(attention_heads_fused.size(0), -1)
            _, indices = flat.topk(int(flat.size(-1)*discard_ratio), -1, False)
            indices = indices[indices != 0]  #cls 토큰은 드롭 안하기
            flat[0, indices] = 0

            I = torch.eye(attention_heads_fused.size(-1))  #잔차연결 계산을 위한 단위행렬
            a = (attention_heads_fused + 1.0*I)/2  #논문 구현대로 0.5의 비율로 잔차연결
            a = a / a.sum(dim=-1)  #이론상으로 a의 총합은 1이지만 컴퓨터의 소수점 연산 오차의 누적을 막기 위해 레이어 생성 때마다 정규화

            result = torch.matmul(a, result)

    # Look at the total attention between the class token,
    # and the image patches
    mask = result[0, 0 , 1:]
    #cls 벡터에서 cls토큰 제외하기
    # 이미지 크기 384, 패치 크기 16 모델이다. 576개의 이미지 패치(24*24)
    width = int(mask.size(-1)**0.5)
    mask = mask.reshape(width, width).numpy()
    mask = mask / np.max(mask)   #시각적 품질 향상을 위해 최댓값으로 정규화
    return mask  #(24,24)

class VITAttentionRollout:
    def __init__(self, model, attention_layer_name='attn_drop', head_fusion="mean",
        discard_ratio=0.9):
        self.model = model
        self.head_fusion = head_fusion
        self.discard_ratio = discard_ratio
        for name, module in self.model.named_modules():
            if attention_layer_name in name:
                module.register_forward_hook(self.get_attention)   #forward에서 어텐션맵 빼오는 예약 걸어둠. model에 input흘리면 실행

        self.attentions = []

    def get_attention(self, module, input, output):
        self.attentions.append(output.cpu())

    def __call__(self, input_tensor):
        self.attentions = []
        with torch.no_grad():
            output = self.model(input_tensor)

        return rollout(self.attentions, self.discard_ratio, self.head_fusion)
간략하게 설명하면,
먼저 헤드를 섞는 방식을 고릅니다.(해당 모델의 헤드 개수는 12개)
자잘한 노이즈를 없에기 위해 마스크를 이용해서 하위90%의 픽셀은 0으로 만들어버리고, 잔차연결을 더해줍니다.(0.5)
어텐션 맵들을 훅을 이용해서 리스트에 담고, 순서대로 matmul 해줍니다.
마지막에 0번째 행, 즉 cls 벡터에서 cls토큰을 제외하고 일렬로 나열된 나머지 576개의 이미지 패치를 2차원으로 바꿔줍니다.
이해가 잘 안되는 부분이 있다면 댓글 남겨주시기 바랍니다.
rollout_output=VITAttentionRollout(model)
mask=rollout_output(input)
print(mask.shape)
---------------------------------------------------------------------------
IndexError Traceback (most recent call last)
/tmp/ipykernel_58/1133337965.py in <cell line: 0>()
1 rollout_output=VITAttentionRollout(model)
----> 2 mask=rollout_output(input)
3 print(mask.shape)
/tmp/ipykernel_58/4086692976.py in __call__(self, input_tensor)
56 output = self.model(input_tensor)
57
---> 58 return rollout(self.attentions, self.discard_ratio, self.head_fusion)
/tmp/ipykernel_58/4086692976.py in rollout(attentions, discard_ratio, head_fusion)
1 def rollout(attentions, discard_ratio, head_fusion):
----> 2 result = torch.eye(attentions[0].size(-1)) #어텐션 맵 하나의 크기는 [1, 12, 577, 577](배치, 헤드, 토큰, 토큰)
3 #처음 곱셈을 시작할 단위행렬 생성
4 with torch.no_grad():
5 for attention in attentions: #헤드를 섞는 방식. 논문에서는 mean
IndexError: list index out of range여기서 문제가 발생합니다. 분명 알맞는 레이어에 훅을 걸었는데 list index out of range 에러가 나왔습니다. 아마도 훅이 제대로 걸리지 않은 것 같아 호출되는지 테스트를 해보았습니다.
# hook 직접 걸어서 호출되는지 테스트(훅 안걸리는 문제 발생)
handles = []
test_outputs = []

def test_hook(module, input, output):
    test_outputs.append(output)
    print("hook 호출됨!", output.shape)

for name, module in model.named_modules():
    if 'attn_drop' in name:
        handles.append(module.register_forward_hook(test_hook))

with torch.no_grad():
    output = model(input)

print(f"총 호출 횟수: {len(test_outputs)}")

# hook 제거
for h in handles:
    h.remove()
총 호출 횟수: 0
역시나 훅이 걸리지 않은 것이 문제였습니다. 한참동안 뭐가 문제인지 고민하다가 claude의 도움을 받아 모델의 forward를 확인해보고, attn_drop 계층이 호출되는지 직접 확인해보라는 조언을 받았습니다.
#모델 forward에서 attn_drop계층이 호출되는지 확인
#inspect는 소스 코드 자체를 텍스트로 보여주는 라이브러리
import inspect
print(inspect.getsource(model.blocks[0].attn.forward))
def forward(
self,
x: torch.Tensor,
attn_mask: Optional[torch.Tensor] = None,
is_causal: bool = False,
) -> torch.Tensor:
B, N, C = x.shape
qkv = self.qkv(x).reshape(B, N, 3, self.num_heads, self.head_dim).permute(2, 0, 3, 1, 4)
q, k, v = qkv.unbind(0)
q, k = self.q_norm(q), self.k_norm(k)
if self.fused_attn:
x = F.scaled_dot_product_attention(
q, k, v,
attn_mask=attn_mask,
dropout_p=self.attn_drop.p if self.training else 0.,
is_causal=is_causal,
)
else:
q = q * self.scale
attn = q @ k.transpose(-2, -1)
attn_bias = resolve_self_attn_mask(N, attn, attn_mask, is_causal)
attn = maybe_add_mask(attn, attn_bias)
attn = attn.softmax(dim=-1)
attn = self.attn_drop(attn)
x = attn @ v
x = x.transpose(1, 2).reshape(B, N, self.attn_dim)
x = self.norm(x)
x = self.proj(x)
x = self.proj_drop(x)
return xself.fused_attn이 True라면 self.attn_drop 대신 F.scaled_dot_product_attention이 실행되고, 이는 attention 행렬을 중간에 메모리에 올리지 않고 바로 Value matrix까지 곱해버린다고 합니다. attention map이 메모리에 올라온 적이 없기 때문에 훅이 절대로 걸리지 않았던 것이 문제였습니다.
#F.scaled_dot_product_attention은 PyTorch 내장 커널이라 attention 행렬을 중간에 메모리에 올리지 않고 한 번에 처리. (FlashAttention 방식)
#attention map을 잡을 수가 없다.
#fused_attn을 false로 해주기
for block in model.blocks:
    block.attn.fused_attn = False
self.fused_attn을 False로 바꿔서 self.attn_drop이 호출될 수 있도록 해줍니다.
rollout_output=VITAttentionRollout(model)
mask=rollout_output(input)
print(mask.shape)
(24,24)
Attention Map 시각화
보간함수를 이용해 mask를 원본 이미지 위에 덧씌워보겠습니다.
from torch.nn import functional as F

attn_map=F.interpolate(
    input=torch.tensor(mask).unsqueeze(0).unsqueeze(0),   #F.interpolate는 [배치, 채널, H, W] 텐서 입력받음
    size=(image.shape[0], image.shape[1]),
    mode='bilinear'
).squeeze().detach().numpy()


plt.figure(figsize=(5,5))
plt.imshow(image)
plt.imshow(attn_map, cmap='jet', alpha=0.6)

plt.axis('off')
plt.show() 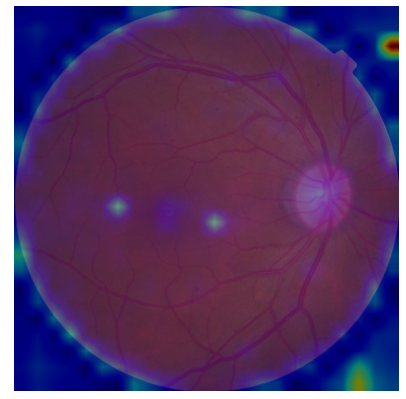
망막 이미지 내에 잡힌 2개의 어텐션이 확인됩니다.
배경과 망막을 구분하는 경계선은 어텐션이 잘 된 모습을 확인할 수 있는데, 배경에 어텐션이 강하게 된 두 지점을 확인할 수 있습니다.
왜 배경에 어텐션이 강하게 되었는지 이해가 가지 않아서 두가지 가설을 세워보았습니다.
- Rollout을 구현하는 코드를 보면 자잘한 노이즈를 쳐내기 위해 하위 90%의 데이터 값은 전부 0으로 만들어버리는 과정에서, 저 부분만 특별히 강하게 어텐션된 것처럼 보인다.
- 저번에 rollout 논문을 리뷰하면서 들었던 생각인데, 무의미한 정보가 증폭될 수도 있겠다는 생각이 들었습니다. 예를 들어
$$\text{레이어 1: 무의미한 토큰에 } 0.1 \text{ attention}$$ $$\text{레이어 2, 3, 4: 해당 노드를 } 0.9 \text{씩 attention}$$을 하는 상황으로 설정해보고 rollout을 계산하면
$$\text{Rollout} = 0.1 \times 0.9 \times 0.9 \times 0.9 = 0.0729$$
$$\text{원래 기여량: } 0.1 \quad \xrightarrow{\text{레이어 누적}} \quad 0.0729$$ $$\text{→ 상위 레이어의 높은 가중치가 하위의 작은 정보량을 유지시킵니다.}$$
더 극단적인 상황을 가정해보면
$$0.1 \times 0.9^{11} \approx 0.031$$
$$\text{12개 레이어를 거쳐도 여전히 3%의 영향력이 유지됩니다.}$$
이런 경우 배경처럼 무의미한 토큰이 사라지지 않고 끈질기게 살아남아서 어텐션 맵을 오염시킬 수도 있습니다.
첫번째 가설을 실험하기 위해 discard_ratio를 0으로 하고 mask를 다시 씌워봤는데
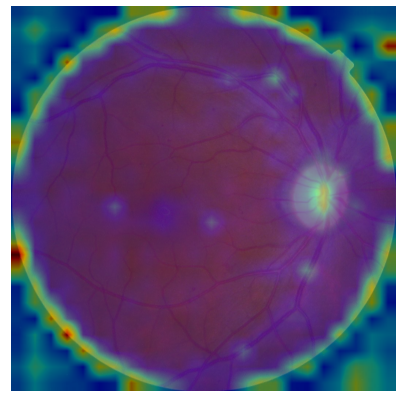
이런 결과가 나왔습니다. 모든 배경이 강하게 어텐션 된 것을 보아 1번 가설이 유력하고, 아마 배경을 학습하기 위해 어텐션 된 것이 아닐까 생각해보았습니다.
모델 해석 능력을 더 확실하게 평가하기 위해 이번에는 다른 이미지로 attention map을 구해보았습니다.

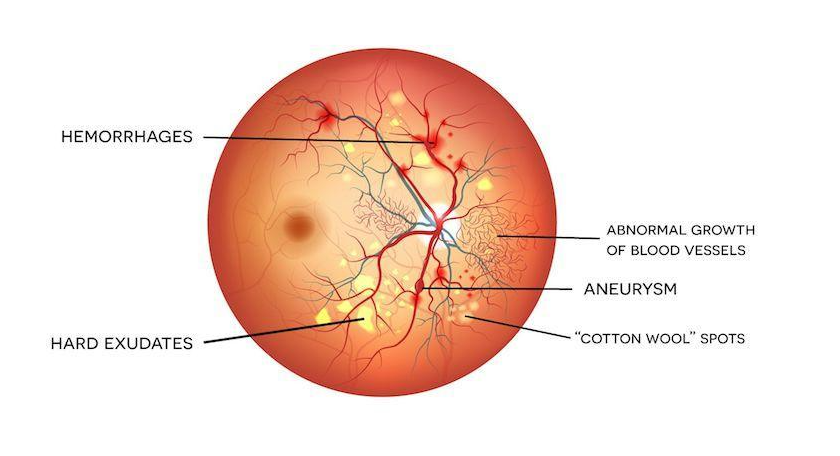
왼쪽 하단의 반점들이 Diabetic Retinopathy의 증상 중 하나일 것으로 예측됩니다.
Attention Rollout으로 attention map을 구해보면

경계부분과 증상 중 하나일 것으로 예측한 반점에 어텐션을 하고 있는 모습입니다.
Conclusion
논문 리뷰로만 공부했던 attention rollout을 실제 데이터와 모델에 적용해보았습니다. CNN grad-cam처럼 간단할 줄 알았는데 예상외로 시간이 많이 소요되었습니다. 그래도 시행착오를 겪으면서 배우고, 실제 모델에 적용해 결과를 봤다는 것만으로도 의미가 있었습니다. 제가 세운 가정 2가 실제로 rollout의 문제점으로 작용할 수 있는지 궁금한데, 언젠가 관련 실험을 해보고 싶어졌습니다.
다음 글은 APTOS dataset/ViT 학습을 시키며 공부한 내용으로 찾아뵙도록 하겠습니다.